An "estimate in image" dof calculator
The basics
This is a new dof calculator which gives the same results as an usual dof calculator. The main difference is that instead of estimating distances on the scene, it requires that you simply estimate directly in the image.
The method works in use cases where you have a reference plane, like a street, floor of a building, flat landscape, river... The focus plane, and the near/far limits of the dof must have positions in this plane typically represented as horizontal lines... You must also be able to easily estimate the altitude of the camera above this plane.
The simple formula in the image dimension
f is the focal length (real not equivalent)
r is the portion of the total image (in the height dimension) in terms of ratio (1/3, ..) which represents the area between the focus line in the reference plane and the dof limit still in this reference place.
k is a number of pixels, representing the resolutions that you have at your limits. k =800 in landscape mode or 1200 in portrait mode gives results 100% consistent with an usual dof calculator (similar to Coc = 0.03mm for FF)
h is the height of the camera above the reference plane
Important
This formula is 100% independent of sensor size !!!
assumptions
A few constraints to see if the method can apply:
A reference plane
You must have a reference where you will have the different positions of these distant planes:
near dof limit plane
focus plane
far dof limit plane
This plane works with straight plane, but this is used as an estimate method so you have some latitude. It does not necessarily have to be at the same altitude, it can have a constant slope. The positions of these planes along the plane of reference is displayed with horizontal lines.
A known altitude above this plane
You must be able to estimate the altitude above the reference plane taking into account the tilt if any:
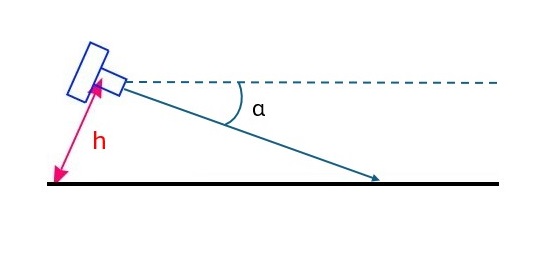
A few remarks
Your height does not change, if for instance you shoot at eyes level you will use mainly the same h everytime.
in many use cases, the tilt is 98% neglectible. In landscape photography, streets, inside buildings, the tilt is often minor.
If this is not the case, you can either estimate directly the distance h (see the schema above) or apply an adjustment with the formula:
Do not focus and recompose
This is a normal assumption for better accuracy.
Step 1: Select near + far focus limit method
Here is the first important point
Important
In the image, the focus plane position in the reference plane is at mid distance between the near and far focus plane positions.
With the dof calculator, you select both limits and it automatically draw a horizontal line at the focus distance which gives equal sharpness for both limits.
Step 2: compute f#
The dof calculator computes f# based on the formula.
It also gives the f# taking into account diffraction.
An alternative method (Select focus + limit)
Sometimes you want to focus closer to one or the other limit. The dof calculator allows to first set where the focus line is and then to set the limit that you want to be acceptably sharp. The other limit being closer, it will be sharper. Some people prefer to give priority to the background of foreground, using this method is certainly preferable.
A few tricks
Easy calculations
If h=1600mm, which is common, the ratio k/h = 0.5 which makes the equations really easy.
Tip
800/1600 = 0.5 !!!!
Or you can use 1600/1600 = 1 (1600 is for very sharp)
You can use this number is adjust slightly the result after you used this simplifcation
estimate the portion of the image with the grid lines
If you display the grid lines (3x3, 4x4), you can better estimate the ratio of the image for the corresponding area.
Infinity + hyperfocal
This is at the end of your plane, just a bit above. Imagine somebody having the same height as you, draw a line at the same "altitude" above this end point.
Hyperfocal is made easy with this method.
estimate tilt with camera level
mirrorless displays the camera level with the tilt up/down, it can help to adjust h.
diffraction taken into account
You have also the optimal f# (called f# diffraction) to use for maximum sharpness at the near/far limits. This is calculated using this equation
This will give a good resolution at these limits but will often reduce the resolution near the focus plane. Using the first f# as a minimum value and the diffraction f# as the maximum value can be of a great help for the photographer.